Winterlude Keyhole Scarflet- a free tutorial
Last October my BBB (best bloggy buddy) Vicki from Off The Hook in the UK sent me a lovely skein of Debbie Bliss Cashmerino.


Rw6: SC in 1st st,
Ch1, *(Ch1, sc in next Ch1 space) . Repeat from * 5 times. Ch1, sc in last st
of previous row. Ch1, turn. [7sc, 6 x Ch1 spaces]
Rw12: SC in 1st st, Ch1, *(Ch1, sc in next Ch1 space) . Repeat from * 11 times. Ch1, sc in last st of previous row. Ch1, turn. [13sc, 12 x Ch1 spaces]
For now until the end of the pattern, the Ch2 of the previous row will also count as the last stitch. You will crochet your last single crochet into the last Ch2 space, before you are then instructed to “Ch2, turn”.
Repeat Row 18 for 123 more rows. You may choose to crochet more or less if you want, but this is where we work the ‘keyhole’ and the last row must be an ‘odd’ numbered row.

Repeat Row 143 x 15, ending with Row 158. Do not finish off this time. End Row 158 WITH the ‘Ch2, turn’.
Rw166: SC in the 1st
Ch1 space. *(Ch1, sc in next Ch1 sp). Repeat from * 14 times. Ch1, turn. [15sc]
 I have used a delicious chunky yarn available in Australia called Moda Vera 'Shiver'. But if you can't get anything like that, type that name into the Yarn Substitute website www.yarnsub.com and it will give you a list of compatible yarns from around the world!
Grab yer stuff:
200gm Chunky Yarn
8mm crochet hook
2 faux fur pompoms
needle & thread


Rw2: SC in 1st st, ch1, sc in next Ch1 space (immediately after st from previous row), Ch1, sk next st, sc in next Ch1 sp of previous row. Ch1, sc in last st of previous row. Ch1, turn. [4sc, 3 x Ch1 spaces]


She had dyed it herself in these beautiful Autumnal colours of greens, rusty oranges, blues.
You can view the process on her blog post here.
She created one skein for herself as well and set a challenge for us to each create a new thing from our 100gm skein.


And she gave us 1 week to do it. HA!
Now I know I'm awesome, but even I know my limitations. So I asked if maybe we could give ourselves 1 month instead. So we agreed on a 1 month time limit to create something each and share the pattern with you.
So now nearly 4 months later, we've finally finished!!
Vicki has designed some super warm mitts for you to try. You can find her free pattern on her blog here.
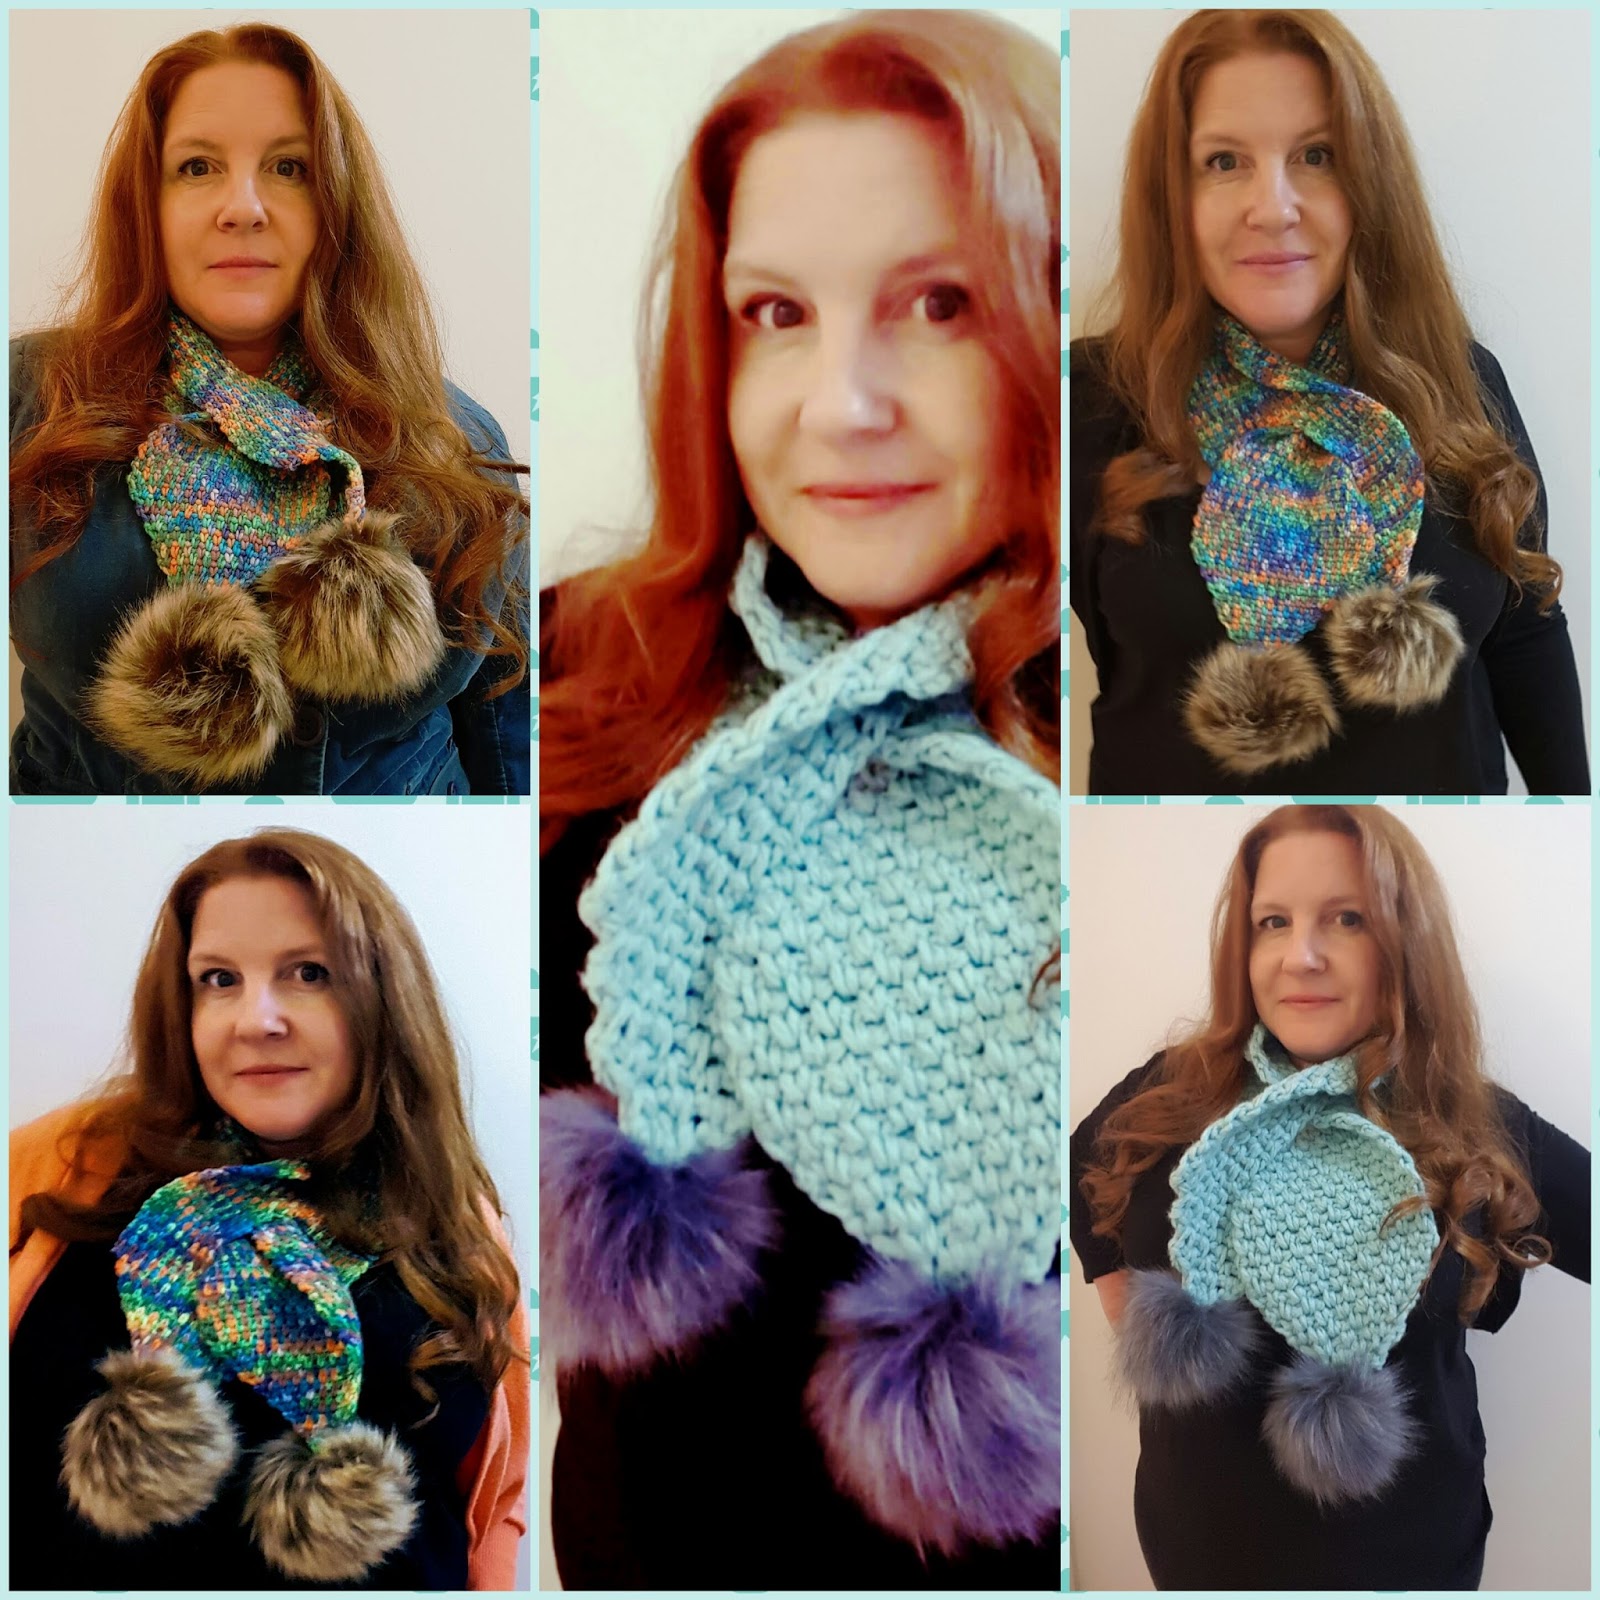
And I have designed a cosy scarflet.

I've actually written the pattern for a Scarflet using the Debbie Bliss Cashmerino with a 4.5mm hook AND for a Scarflet using a super chunky yarn with an 8mm hook.

The Scarflets are basically the same but with enough differences for me to give you 2 tutorials.
Vicki has designed some super warm mitts for you to try. You can find her free pattern on her blog here.
And I have designed a cosy scarflet.

I've actually written the pattern for a Scarflet using the Debbie Bliss Cashmerino with a 4.5mm hook AND for a Scarflet using a super chunky yarn with an 8mm hook.

The Scarflets are basically the same but with enough differences for me to give you 2 tutorials.
FREE!
As with many of my patterns, if you would like a printable PDF, you can purchase a digital download from my Etsy, or Ravelry or LoveCrochet Stores for the super low price of US$1. Admin costs baby!!
There are two versions. I first created a delicious scarflet using the Debbie Bliss cashmerino which I've named 'Winterlude' Keyhole Scarf: Light & Warm.
The second version uses a thick chunky acrylic which I've named 'Winterlude Keyhole Scarf: Thick & Cosy
The second version uses a thick chunky acrylic which I've named 'Winterlude Keyhole Scarf: Thick & Cosy
For 'Winterlude' Keyhole Scarf: Light & Warm:

Grab yer stuff:
- 100gm of Debbie Bliss Cashmerino. For substitute yarns, visit www.yarnsub.com
- 4.5mm Crochet Hook
- 2 faux fur or home made pompoms
- darning needle & thread.
Abbreviations: (US crochet terms used)
- Beg: beginning
- Ch: chain
- Sc: single crochet
- Sk: skip
- Sl st: slip stitch
- St: stitch
The beginning ‘increase rows’ require you to crochet in the
1st and last single SC stitches of the previous row, but in the middle of the
rows, only work SC in the Chain 1 spaces. This creates the Moss Stitch effect.
Once the increase rows are complete and you are working on
the body of the Scarflet, no crochet stitches are worked in the top of SC
stitches of the previous rows. Only in the Ch1 and Ch2 spaces.
Chain 6.

Increase Rows.

Increase Rows.
Row 1: SC in 2nd
ch from the hook. Sc in remaining 4 chains across. Ch1, turn. [5sc]
Rw2: SC in 1st st, ch1, skip next stitch, sc in next stitch, Ch1, skip next stitch, sc in last stitch. Ch1, turn. [3sc, 2 x Ch1 spaces]
Rw2: SC in 1st st, ch1, skip next stitch, sc in next stitch, Ch1, skip next stitch, sc in last stitch. Ch1, turn. [3sc, 2 x Ch1 spaces]

Rw3: SC in 1st
st, *(ch1, sc in next Ch1 sp). Repeat from * 2 times. Ch 1, sc in last st. Ch1,
turn. [4sc, 3 x Ch1 spaces]
Rw4: SC in 1st
st, Ch1, *(Ch1, sc in next Ch1 space) . Repeat from * 3 times. Ch1, sc in last
st of previous row. Ch1, turn. [5sc, 4 x Ch1 spaces]
Rw5: SC in 1st st,
Ch1, *(Ch1, sc in next Ch1 space) . Repeat from * 4 times. Ch1, sc in last st
of previous row. Ch1, turn. [6sc, 5 x Ch1 spaces]

Rw7: SC in 1st st,
Ch1, *(Ch1, sc in next Ch1 space) . Repeat from * 6 times. Ch1, sc in last st
of previous row. Ch1, turn. [8sc, 7 x Ch1 spaces]
Rw8: SC in 1st st,
Ch1, *(Ch1, sc in next Ch1 space) . Repeat from * 7 times. Ch1, sc in last st
of previous row . Ch1, turn. [9sc, 8 x Ch1 spaces]
Rw9: SC in 1st st,
Ch1, *(Ch1, sc in next Ch1 space) . Repeat from * 8 times. Ch1, sc in last st
of previous row. Ch1, turn. [10sc, 9 x Ch1 spaces]
Rw10: SC in 1st st,
Ch1, *(Ch1, sc in next Ch1 space) . Repeat from * 9 times. Ch1, sc in last st
of previous row. Ch1, turn. [11sc, 10 x Ch1 spaces]
Rw11: SC in 1st st,
Ch1, *(Ch1, sc in next Ch1 space) . Repeat from * 10 times. Ch1, sc in last st
of previous row. Ch1, turn. [12sc, 11 x Ch1 spaces]

Rw12: SC in 1st st, Ch1, *(Ch1, sc in next Ch1 space) . Repeat from * 11 times. Ch1, sc in last st of previous row. Ch1, turn. [13sc, 12 x Ch1 spaces]
Rw13: SC in 1st st,
Ch1, *(Ch1, sc in next Ch1 space) . Repeat from * 12 times. Ch1, sc in last st
of previous row. Ch1, turn. [14sc, 13 x Ch1 spaces]
Rw14: SC in 1st st,
Ch1, *(Ch1, sc in next Ch1 space) . Repeat from * 13 times. Ch1, sc in last st
of previous row. Ch1, turn. [15sc, 14 x Ch1 spaces]
Rw15: SC in 1st st,
Ch1, *(Ch1, sc in next Ch1 space) . Repeat from * 14 times. Ch1, sc in last st
of previous row. Ch1, turn. [16sc, 15 x Ch1 spaces]
The Main Body
*Handy tip: to keep
track of rows, it is handy to place a stitch marker every 10 rows. I also place a stitch marker at the end of
the first of the ‘non increase rows’.
Please note the small
change in Row 16 below (in bold).
Rw16: SC in 1st st,
Ch1, *(Ch1, sc in next Ch1 space) . Repeat from * 15 times. Ch1, sc in last st
of previous row. Ch2, turn. [17sc, 16
x Ch1 spaces]
So work your first single crochet stitch into the first Ch1 space where the pin is!
For now until the end of the pattern, the Ch2 of the previous row will now count as the 1st stitch. You will crochet your first single crochet into the next available Ch1 space, which will be after the last single crochet stitch of the previous row.
 |
For now until the end of the pattern, the Ch2 of the previous row will now count as the 1st stitch. You will crochet your first single crochet into the next available Ch1 space, which will be after the last single crochet stitch of the previous row.
Rw17: Skip the 1st
st, SC in the next Ch1 sp. *(Ch1, SC in next Ch1 sp). Repeat from * 15 times.
Ch1, sc in the top of the last stitch of the previous row. Ch2, turn.

For now until the end of the pattern, the Ch2 of the previous row will also count as the last stitch. You will crochet your last single crochet into the last Ch2 space, before you are then instructed to “Ch2, turn”.
Rw18: SC in the 1st
Ch1 space. *(Ch1, sc in next Ch1 sp). Repeat from * 16 times. Ch1, sc in last
Ch2 sp. Ch2, turn. [17sc, 8 x Ch1 spaces]
 |
| This is what your scarflet should look like after Row 19. |
Repeat Row 18 for 123 more rows. You may choose to crochet more or less if you want, but this is where we work the ‘keyhole’ and the last row must be an ‘odd’ numbered row.
The Keyhole
Rw142:Skip
the 1st stitch, then *(Sc in next Ch1 sp, Ch1, skip next SC). Repeats
from * 7 times. Sc in next Ch1 space, Ch2, turn. [8sc, 7 x Ch1 sp]
Rw143: Sk 1st
stitch, *( Sc in next Ch 1 sp, Ch1, skip next sc). Repeat from * 7 times. Sc in
last Ch2 space. Ch 2, turn. [8sc, 7 x Ch1 sp]. (Do not Ch2 at the end of Row
158).
Repeat Row 143 x 15, ending with Row 158. In the last row,
DO NOT CH2. Finish off.

Now you have finished one half of ‘the split’, let’s work on
the other half!
Join the yarn at the unworked end of Row 141 (which will be
the beginning of this section of Row 142).
Repeat Row 142.

Repeat Row 143 x 15, ending with Row 158. Do not finish off this time. End Row 158 WITH the ‘Ch2, turn’.
Rw159: Skip 1st
stitch and SC in the next Ch1 sp. *(Ch1, sc in the next Ch1 sp). Repeat from * 8
times. Ch1, then join with an Sc in the next Ch2 sp other side of the split.
*(Ch1, sc in the next Ch1 sp). Repeat from * 6 times. Ch1, sc in the top of the
last sc of the previous row. Ch2, turn.
Rw160: SC in the 1st Ch1 space. *(Ch1, sc in next Ch1 sp). Repeat from * 16 times. Ch1, sc in last Ch2 sp. Ch2, turn. [17sc, 8 x Ch1 spaces]
 |
| In Row 159: don't you love it when both sides come together? |
Rw160: SC in the 1st Ch1 space. *(Ch1, sc in next Ch1 sp). Repeat from * 16 times. Ch1, sc in last Ch2 sp. Ch2, turn. [17sc, 8 x Ch1 spaces]
Repeat Row 160 x 4. At the end of Rw 164, DO NOT CH2. Only
Ch1, then turn.
The Decrease Rows
Rw165: SC in the 1st
Ch1 space. *(Ch1, sc in next Ch1 sp). Repeat from * 15 times. Ch1, turn. [16sc]
Rw167: SC in the 1st
Ch1 space. *(Ch1, sc in next Ch1 sp). Repeat from * 13 times. Ch1, turn. [14sc]
Rw168: SC in the 1st
Ch1 space. *(Ch1, sc in next Ch1 sp). Repeat from * 12 times. Ch1, turn. [13sc]
Rw169: SC in the 1st
Ch1 space. *(Ch1, sc in next Ch1 sp). Repeat from * 11 times. Ch1, turn. [12sc]
Rw170: SC in the 1st
Ch1 space. *(Ch1, sc in next Ch1 sp). Repeat from * 10 times. Ch1, turn. [11sc]
Rw171: SC in the 1st
Ch1 space. *(Ch1, sc in next Ch1 sp). Repeat from * 9 times. Ch1, turn. [10sc]
Rw172: SC in the 1st
Ch1 space. *(Ch1, sc in next Ch1 sp). Repeat from * 8 times. Ch1, turn. [9sc]
Rw173: SC in the 1st
Ch1 space. *(Ch1, sc in next Ch1 sp). Repeat from * 7 times. Ch1, turn. [8sc]
Rw174: SC in the 1st
Ch1 space. *(Ch1, sc in next Ch1 sp). Repeat from * 6 times. Ch1, turn. [7sc]
Rw175: SC in the 1st
Ch1 space. *(Ch1, sc in next Ch1 sp). Repeat from * 5 times. Ch1, turn. [6sc]
Rw176: SC in the 1st
Ch1 space. *(Ch1, sc in next Ch1 sp). Repeat from * 4 times. Ch1, turn. [5sc]
Rw177: SC in the 1st
Ch1 space. *(Ch1, sc in next Ch1 sp). Repeat from * 3 times. Ch1, turn. [4sc]
Rw178: SC in the 1st
Ch1 space. *(Ch1, sc in next Ch1 sp). Repeat from * 2 times. Finish off! [3sc]
 |
| All the wonderful decreases! |
Finish Off. Sew in all thread ends.
Grab those
two gorgeous fluffy pom poms, and sew one securely onto each end of the
scarflet.
Winterlude Keyhole Scarflet: Thick & Cosy

Grab yer stuff:
200gm Chunky Yarn
8mm crochet hook
2 faux fur pompoms
needle & thread

As with the previous pattern, the beginning ‘increase rows’
require you to crochet in the 1st and last single SC stitches of the
previous row, but in the middle of the rows, only work SC in the Chain 1
spaces. This creates the Moss Stitch effect.
Once the increase rows are complete and you are working on
the body of the Scarflet, no crochet stitches are worked in the top of SC
stitches of the previous rows. Only in the Ch1 and Ch2 spaces.
Chain 4

Increase Rows:
Row 1: SC in 2nd
ch from the hook. Ch1, sc in next ch, ch1, sc in last ch. Ch1, turn. [3sc, 2 x
Ch1 spaces]

Rw2: SC in 1st st, ch1, sc in next Ch1 space (immediately after st from previous row), Ch1, sk next st, sc in next Ch1 sp of previous row. Ch1, sc in last st of previous row. Ch1, turn. [4sc, 3 x Ch1 spaces]

Rw3: SC in 1st
st, ch1, sc in next Ch1 sp, Ch1, sk next st, sc in next Ch1 sp, Ch1, sk st, sc
in next Ch1 sp, Ch 1, sc in last st. Ch1, turn.
[5sc, 4 x Ch1 spaces]
Rw4: SC in 1st
st, Ch1, *(Ch1, sc in next Ch1 space) . Repeat from * 4 times. Ch1, sc in last
st of previous row. Ch1, turn. [6sc, 5 x Ch1 spaces]
Rw5: SC in 1st st,
Ch1, *(Ch1, sc in next Ch1 space) . Repeat from * 5 times. Ch1, sc in last st
of previous row. Ch1, turn. [7sc, 6 x Ch1 spaces]
Rw6: SC in 1st st,
Ch1, *(Ch1, sc in next Ch1 space) . Repeat from * 6 times. Ch1, sc in last st
of previous row. Ch1, turn. [8sc, 7 x Ch1 spaces]
Rw7: SC in 1st st,
Ch1, *(Ch1, sc in next Ch1 space) . Repeat from * 7 times. Ch1, sc in last st
of previous row. Ch2, turn. [9sc, 8
x Ch1 spaces]
Main body
*Handy tip: to keep track of rows, it is handy to place a
stitch marker every 10 rows. I also
place a stitch marker at the end of the first of the ‘non increase rows’.
For now until the end of the pattern, the Ch2 of the
previous row will now count as the 1st
stitch. You will crochet your first single crochet into the next available
Ch1 space, which will be after a single crochet stitch.
Rw8: SC in the 1st
Ch1 space of the previous row. *(Ch1, sc
in next Ch1 sp). Repeat from * 7 times. Ch1, sc in top of last sc of previous
row. Ch2, turn. [9sc, 8 x Ch1 spaces]

For now until the end of the pattern, the Ch2 of the
previous row will also count as the last
stitch. You will crochet your last single crochet into the last Ch2 space,
before you are then instructed to “Ch2, turn”.
Rw9: SC in the 1st
Ch1 space. *(Ch1, sc in next Ch1 sp). Repeat from * 7 times. Ch1, sc in last
Ch2 sp. Ch2, turn. [9sc, 8 x Ch1 spaces]
Repeat Row 9 x 59 times.

The Keyhole
Rw69: SC in next Ch1
sp. *(Ch1, sc in next Ch1 sp). Repeat from * 3 times. Ch2, turn. [4 sc, 3 x Ch1
spaces]

Rw70: SC in next Ch1
sp. *(Ch1, sc in next Ch1 sp). Repeat from * 2 times. Ch1, sc in last Ch2 sp.
Ch2, turn. (Do not Ch2 at the end of Row 78).
Repeat Row 70 x 8. At the end of Row 78, finish off.

Now you have finished one half of ‘the split’, let’s work on
the other half!
Join the yarn at the unworked end of Row 68 (which will be
the beginning of this section of Row 69).

Repeat Row 69.

Repeat Row 70 x 9. Do not finish off this time. End Row 78 WITH
the ‘Ch2, turn’.

Rw79: SC in the next
Ch1 sp. *(Ch1, sc in the next Ch1 sp). Repeat from * 2 times. Ch1, then join
with an Sc in the next Ch2 sp other side of the split. *(Ch1, sc in the next
Ch1 sp). Repeat from * 3 times. Ch1, sc in the top of the last sc of the
previous row. Ch2, turn.

Rw80: SC in the next
Ch1 sp. *(Ch1, sc in next Ch1 sp). Repeat from * 6 times including across the
Ch1 sp bridging across the split. Ch1, sc in last Ch2 sp. Ch2, turn.
Rw81: SC in the 1st
Ch1 space. *(Ch1, sc in next Ch1 sp). Repeat from * 6 times. Ch1, sc in last
Ch2 sp. Ch2, turn. [8sc, 7 x Ch1 spaces]
The Decrease Rows
Rw82: SC in the 1st
Ch1 space. *(Ch1, sc in next Ch1 sp). Repeat from * 6 times. Ch1, turn. [7sc, 6 x Ch1 spaces]

Rw83: SC in the 1st
Ch1 space. *(Ch1, sc in next Ch1 sp). Repeat from * 5 times. Ch1, turn. [6sc, 5
x Ch1 spaces]
Rw84: SC in the 1st
Ch1 space. *(Ch1, sc in next Ch1 sp). Repeat from * 4 times. Ch1, turn. [5sc, 4
x Ch1 spaces]

Rw85: SC in the 1st
Ch1 space. *(Ch1, sc in next Ch1 sp). Repeat from * 3 times. Ch1, turn. [4sc, 3
x Ch1 spaces]
Rw86: SC in the 1st
Ch1 space. *(Ch1, sc in next Ch1 sp). Repeat from * 2 times. Ch1, turn. [3sc, 2
x Ch1 spaces]
Rw87: SC in the 1st
Ch1 space. Ch1, sc in next Ch1 sp. Ch1,
turn. [2sc, 1 x Ch1 spaces]

Finish Off. Sew in all thread ends.
Grab those two gorgeous fluffy pom poms, and sew one securely onto each end of the scarflet.
And you're done!

How did you go? Feeling much warmer now, aren't you?
I'm super snug and cosy! In fact I'm absolutely sweltering. Do you want to know why?
Because right now, here in Kangarooland it's summer.
And on the day I took these photos, it was 37c outside. That's 99F!!!! F for certain words you use when you're wearing a winter scarf in the middle of summer!!!
I took these inside the house with no less than:
one dodgy airconditioner
two standing fans
and
three big boxy coolers
My house sounded like one of those wind tunnels they test race cars in.
So I am REALLY looking forward to winter this year when I can snuggle one of these scarflets around my neck!

Show me your makes! Pop on over to my Spacey Facey page, or tag me on Instabrag.
xox
Louise
The Red Haired Amazona
Love it Louise! A great challenge, and a great scarf! Thinking I might make myself one on the chilly snowy day, of zero degrees here!
ReplyDeleteLooks good, your scarflets! Can't decide which one I like best...
ReplyDeleteThe yarn is wonderful, I'm going to visit your friends blog rightaway :-)
Have a nice day,
Sigrid
Thank you Sigrid!
DeleteI showed Mom your "Glam" pic... She thinks you look GORGEOUS and loves your HAIR! [For once I'm not disagreeing with her] ;-D
ReplyDeleteMeanwhile, I'm also loving the CASHMERINO! - I don't think I have any in my MEGA-STASH... :-{
oh, BTW, around HERE, we use REAL FUR Puffs!! [Roadkill Squirrels are always a good source in a pinch..] The FAKE stuff feels yukky when it gets wet and takes forever to dry.
Anyhoo, if it helps to "cool" you off, we just got a foot worth of snow today. Thankfully it was "light", but was still coming down while I was out there in the -13C Dark... The Lawn-GLACIER is about 5-feet now...
And more shovelling tomorrow...
#ItNeverStops!
;-}
X