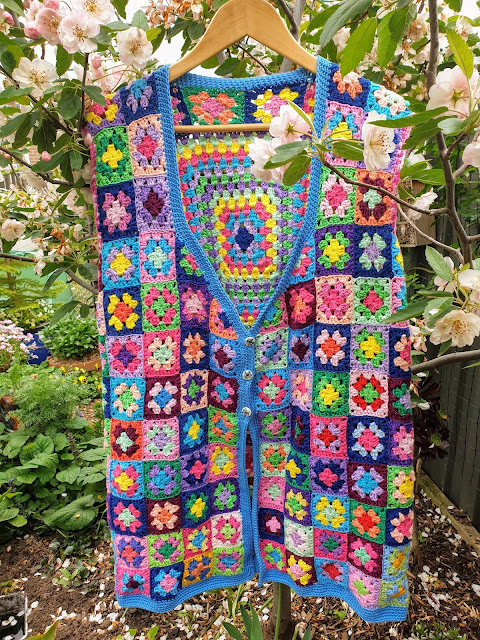
Granny Square Vest is finished!!
I feel like I've been making this Granny Square Vest forever!
It's certainly taken a while but only because I keep putting it down for sometimes weeks as I became preoccupied in the garden.
But at last it's finally finished. I started by drawing up a plan of how I thought it was to be made up.
The colourful little sketch below did get altered somewhat, but more on that later.
Simplistically the whole vest was made of sweet little 3 round granny squares,and some granny triangles to soften the edges. I selected a range of cottons from the Scheepjes Catona range as well as some leftovers from other brands such as from one of local sellers Spotlight etc. I thought of it as a giant cotton stashbuster.
At this stage according to my original plan, the vest was going to be 9 squares long and 8 squares wide for the back piece.
At this stage according to my original plan, the vest was going to be 9 squares long and 8 squares wide for the back piece.
Partway through the Bear suggested I crochet one large granny square for the back. He said it was like how bikers wear leather jackets with their club emblem on the back, only I'm a member of the Crochet Hook Riders and my emblem is a massive ass granny square.
It was supremely satisfying choosing the colour layout.
I laid all the little squares out for the 2 front pieces and the back piece, then stitched them altogether.
I got to this point where the whole vest was in one piece. I had crocheted the little triangles and stitched them in as well. I tried it on.
I laid all the little squares out for the 2 front pieces and the back piece, then stitched them altogether.
I got to this point where the whole vest was in one piece. I had crocheted the little triangles and stitched them in as well. I tried it on.
In the meantime the cat slept on it.
I decided it need 2 more rows around the bottom. I crocheted a stack more squares, stitched them around and then crocheted 5 rows of single crochet stitch all around the entire piece. I started from the bottom right hip, across the bottom front, up the middle, around the neck, backdown the other front piece and down across the front,then back. And kept going 4 more times. In round 3 I left 3 gaps of 4 stitch spaces, and chained to create button holes on one side.

If you would like to make your own granny square vest, I have included some charts I whipped up on Stitchworks Crochet chart software.
I decided it need 2 more rows around the bottom. I crocheted a stack more squares, stitched them around and then crocheted 5 rows of single crochet stitch all around the entire piece. I started from the bottom right hip, across the bottom front, up the middle, around the neck, backdown the other front piece and down across the front,then back. And kept going 4 more times. In round 3 I left 3 gaps of 4 stitch spaces, and chained to create button holes on one side.
I finished off the arm holes with 3 quick rounds of moss stitch.
And after sewing 3 cute little buttons on, it was finally finished!At first when I was laying out all the little squares, there were deliberately a majority which were finished in dark blue. This gave the vest a darker look. But when I edged it in the mid blue, all the other colours popped out so it looks much more kaleidescopic!

The final stats are:
Small granny squares- 166
Large granny square- 1
Small granny triangles- 8
Hidden cat hairs from when 8Track slept on it- infinite
Here's a standard 3 round granny.
And here's a standard triangle granny...
If the charts below look different from what I wrote in my book (photo up top) it's because I decided to add 2 extra rows to make the vest longer which is reflected in the charts below.
You make 2 front pieces, making sure one is a mirror image of the other and making sure your granny squares are facing the right way to show that.
And of course one back piece with the large granny square in the top centre. You an also choose to just have all small granny squares, so you would need to crochet an extra 16 squares.
Louise
Red Haired Amazona


Bravo on the finish! I hope you will model it for us so we can see how stunning you will look in your handmade garment! I think it's brilliant and especially so as you designed it yourself! ((hugs)), Teresa :-)
ReplyDeleteWOW, utterly glorious!!! Those colours are so joyful, I can imagine whenever you wear it you would be carrying around a whole load of happy vibes!
ReplyDeleteLovely to have you visit the Attic, thank you so much for your kind words xxxxxxxx
gorgeous! It is amazing! I remember starting such a project once, what became of it? Probably in a box somewhere. You inspire me to look for it! <3
ReplyDeleteI love granny squares! Your vest is absolutely gorgeous! Such pretty colors. I laughed when you said the kitty slept on it. HA!
ReplyDeleteI see Teresa had been here leaving a comment and so much cheer. I will miss her SOOOOOOOOO much! :(